Trustpilot Reviews

Do you want to set up a home photography studio? This article has everything you need to know about the basics of setting up a (photography flash based) home studio and the basic equipment you’ll need.
For many photographers setting up a home studio is the dream. It allows you to practice and refine your craft in the comfort of your own home, and means you don’t need to heave heavy, cumbersome equipment to and from a studio. You can do your work in your own time and at your own pace with total control.
There are so many photography types that are better suited to a studio. When you’re looking at getting set up at home, you will want to make your studio as versatile and adaptable as possible so that you’re not limited in the work you can do, but not so adaptable that it becomes overly expensive. You need to work out exactly what you’re wanting to do in your home studio. If you’re going to be photographing groups of people, you’re going to need a bigger space that if you were going to photograph a small product. There’s no point freeing up a massive amount of space if you don’t need it, and vice versa. Once you’ve decided on the work you’re going to be doing, and the space you’re going to need, you will need to ensure the space you have is set up correctly.
There are three main things we’re going to look at; first, you’re going to want to think about is the colour of the walls, floor and ceiling. In an ideal world you would have everything completely matt black, but this can look rather uninviting. The reason we would ideally have black, is because black doesn’t bounce light around, and would give you complete control over where your light is going. If you don’t fancy going for a completely black space, then white or gray will still work fine, but you will get light bouncing off the walls and onto your subject. The main thing to take away here is that there shouldn’t be any colour. Coloured walls will simply bounce coloured light onto your subject and mess with your white balance.

Next, you’re going to want to look at the ambient light in the room, and quite often we can use ambient light to our advantage. Sunlight is of course free to use and if used correctly can look very pleasing, however if you want to get creative with light, you only want to be working with controllable artificial light in the room that comes from studio flashes or continuous lighting panels. If you’ve got windows in your studio space, we would advise you to get some blackout curtains to go over them so you can freely add or remove sunlight from the room.
The final thing you want to look at is power sockets. Unless you go for the more expensive battery powered lights, you’re going to need power sockets. Of course, if for some reason there aren’t any power sockets in the space you’re using, you can always use an extension lead from another room, but it’s not as neat and tidy.
Working out what equipment you need in your studio can be a bit of a head scratcher, with the amount of different kinds of lights, modifiers, stands, and backgrounds to choose from. For the rest of this post I’m going to recommend and clear up the confusions about photography equipment for home studios.
If you would like more information or want to know what other options are available, feel free to get in touch with us and we can point you in the right direction.
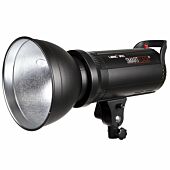
Studio lights come in many shapes and sizes, with lots of different features. The Lencarta SmartFlash 4 is our most popular light for home studio set ups, the SmartFlash 4 is a mains powered 300Ws flash with an S-Fit mount on the front and also has an internal receiver allowing you to remotely control the settings and fire the flash from a trigger on your camera. The power of the Smartflash is adjustable from 9Ws to 300Ws in 1/3 stop increments and has an adjustable modelling lamp to help you see where the light is going to fall. For most studio work, the SmartFlash 4 is a perfect combination of power and functions. The adjustments in power will allow you to light most subjects, from small products all the way up to groups of people. The Smartflash has a S-Fit mount on the front of the flash as standard which allows you to attach a huge range of modifiers like softboxes, beauty dishes, reflectors and more.

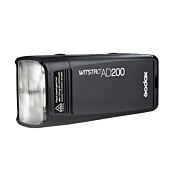
Alternatively, if you don’t have easy access to power sockets, or you want to go completely wireless, we recommend the AD200 Pro. The Godox AD200 Pro is a 200Ws battery powered flash that can be used with a barebulb head which is perfect for using in large modifiers like softboxes and beauty dishes, or it can be used with a standard speedlight style fresnel head. The AD200 Pro has the same built-in receiver as the SmartFlash 4, so you can remotely adjust the settings from the same trigger. The rechargeable lithium ion battery will allow 500 full power flashes, or 1000 half power flashes, or 2000 quarter power flashes, etc. This means you will have plenty of power for a full day of shooting. The AD200 Pro does have its own selection of small modifiers, but if you’re wanting to use any larger softboxes or beauty dishes you will need an S-Fit adapter.

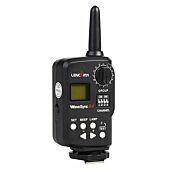
In order to fire and control your lights from your camera, you are going to need something to connect the two, the lights mentioned earlier have built-in receivers and all you need now is a trigger to talk to those receivers. If you’re going for the SmartFlash 4, the best trigger to use is our Wavesync Commander. The SmartFlash 4 doesn’t have HSS or TTL, so you don’t need a fancy trigger. The Wavesync Commander allows you to fire the flash from your camera and remotely control the settings of the flash too.
If you’re going for something like the Godox AD200 Pro, you can still use the same Wavesync Commander, but you won't be able to use HSS and TTL. If you want to use HSS and TTL you will need one of Godox’s X series triggers – either the X1T, X2T, or XPro. If you want to know what the differences are between the 3 triggers, check out the blog post on our learning centre.
Stands are often left as an afterthought when setting up a studio but getting the right stand for the work you’re doing is very important. Depending on the type of photography you’re doing, and the subjects you’re using, you may need something for low level lighting, normal level lighting and overhead lighting. You will need one stand per light. If you’re not sure what kind of stands you’ll need, start with some normal level stands and then add the other types later if you need them.

For low level lighting we recommend our Combined Low Level/Floor Stand. This stand can be adjusted between 56 – 78cm with the centre pole attached, or you can remove the centre pole and have the light almost on the floor. This is exceptionally useful if you’re trying to light the underside of a subject or photographing something small on the floor.
For normal level lighting we recommend our RedLine Pro 265cm Stand. This stand will allow you to position your lights anywhere between 120 – 265cm and is air damped which will protect your equipment when you lower the stand. This is by far our most popular stand due to the high quality and low price. It even comes with a lifetime warranty.
For overhead lighting in a home studio we recommend our Century Stand with Boom Arm (C Stand). The C Stand is made from solid metal making it suitable for even the heaviest of lights and modifiers. It can be adjusted between 130 – 300cm and can be used as a normal light stand, or it can be used with the boom arm attached to get your lights directly above the subject.
This is where the fun really starts. The modifiers you put on your lights make all the difference to how your images come out. The difference between a softbox and a reflector is massive, so choosing the right modifier for your work is vital. Over the years you will find yourself collecting different types and sizes of modifiers. Depending on the work you do, some of them will only get used a few times a year and others will get used daily.
A simple reflector is enough to get started which is already provided if you get a SmartFlash 4. The main aim of a reflector is to direct the light in a beam but doesn’t offer any kind of diffusion. There is a lot you can do with just a reflector to achieve brilliant results and effects.

Another must have accessory to get started with is an umbrella. Umbrellas are one the cheapest light modifiers available and are very simple to use. Despite being very basic light modifiers there is a lot you can do with just an umbrella, regardless of the type of photography doing or the subject you're photographing. Umbrellas are available in various colours and sizes. Our most used umbrellas are 100cm in reflective white and shoot through white, due to white giving a soft and even light output. The only downside to an umbrella is the spread of light. Using an umbrella can be very difficult when trying to control the spread and direction of light which is going to make it much harder to be creative. If you want to control the light better, the best option would be to get a softbox.
Softboxes produce soft light and are available in many different sizes, shapes and styles, the most common shapes you will find are square/rectangular, octagonal and strip. Each softbox will be perfect for a specific job, but most of the time they can be interchangeably used. Strip softboxes were originally designed for lighting wine bottles, but they also work perfectly for full length portraits. The real advantage with using a softbox is that the lighting is much more controlled and directional - you can light what you want to, without the light spreading to areas you don’t want. Honeycombs are also available to attach to the front of the softbox to give even more control over the light. For a lot of people, home studios need to be something they can dismantle easily and put away when they’re not in use. This is why we recommend our ProFold softboxes which are ideal. The Profold softbox range open and close just like and umbrella which means they can be assembled and disassembled in just a few seconds. Our most popular and versatile softboxes is our 95cm octa and is one of our best softboxes for portraits.
There are loads of other modifiers you can get too, but don’t worry about those until you need them. A reflector and an umbrella will work perfectly to get you started.

Backgrounds are the least complicated part of setting up your home studio. If you’re wanting to keep things cheap you can even use one of the walls in the room. If you’re wanting to set things up properly though, you’ll want to get a high-quality photography background. Backgrounds are available in a multitude of different colours and styles, and they come in a couple of different forms. You can get sheets of material - whether that be paper, cotton, vinyl - or you can get pop up backgrounds. Pop up background are cheap, easy to set up, and take up very little room when folded down. The downside to popup backgrounds is their size. The biggest size we have is 150 x 200cm, which is great for portraits and small to medium products, but not suitable for groups of people or large products. If you need a bigger background, then the sheets of material will be much better. We have cotton and paper background available in white, black, blue, green and grey. Most people will start off with a white background, so we recommend going for a white cotton background and then adding more if you need them. If you go for a sheet of material, you are also going to need somewhere to hang it. We have a few different background support stands made by Hakutatz that are available in different sizes to suit your needs. They consist of 2 light stands and a cross bar from which you can hang the backdrop. They all fold up so they can be put away in storage when they’re not needed.
Setting up a home studio is a lot of fun and will help you to practice and refine your photography skills. The equipment you buy and the space you use all comes down to the type of photography you’re doing and the subjects you’re using. If you’re still unsure of what equipment you need, just get in touch. We’re always happy to help advise you and find the things you need for your situation.